The Warpwire Data Import API provides a simple interface for developers to programmatically add, update, and archive groups within Warpwire. The data import APIs are designed to be simple, efficient, and work with your existing record information systems.
This guide does not require any programming experience, and is designed to be integrated into your existing information system. Please note that some of the expected formats may require more advanced programming to ensure that the data is in the correct format as well as automating tasks to run on a daily routine or cron. Additionally, Warpwire may only be able to provide limited support for the use of any APIs.
The Warpwire API requires a software package that can make standard basic authenticated HTTP requests. Warpwire API requests require the use of the secure HTTPS protocol via Transport Layer Security (TLS) - please ensure that your software package provides this functionality. The Warpwire Data Import API returns data in JavaScript Object Notation (JSON) format, and requires that any software package used be able to decode these response objects.
All data import API requests either require the use of HTTP Basic authentication or a pre-assigned valid Warpwire token. If you do not have an authorized token, you may need to supply both a username and password to make each request. You may have to contact your system administrator or Warpwire support to have an authorized key added to the authentication list. If you receive one of the following errors: HTTP/1.1 401 Unauthorized or HTTP/1.1 403 Forbidden, please check your username and password to make sure that they are valid.
Please note that you should be able to make any of these requests via a standard web browser. It is always recommended that you first attempt to access the URL via your browser to ensure that your reporting software can appropriately access the Warpwire Data Import API.
More advanced authentication methods such as the use of OAUTH-based authentication are not covered in this guide.
The data import APIs all use the comma separated values (CSV) format as the data interchange format. Warpwire requires that the CSV file be a UTF-8 encoded text file using standard unix line breaks. It is possible to use a file with traditional Windows line breaks or Mac OS line breaks, but these formats are generally less compatible. If you provide a format that the Warpwire data import system cannot understand, it will return the appropriate error code.
All data imports are part of the standard Warpwire upload process. This means that all data import CSV files will be queued and will be processed in the order that they are received. Every request will have a corresponding token and URL that can be used to periodically confirm the status of the import process. Additionally, if an email address is specified in the initial request, a status email will be sent once the import is complete that includes a summary of which records were added as well as attachments of any detected errors.
Please limit all data import files to 100 megabytes in size. Do not compress or modify the file while uploading them to Warpwire - this will cause the file to be rejected. Additionally, all requests should use the standard HTTP POST upload method. The examples in this document will use the curl utility available on most operating systems. However, the code can be modified to be submitted as a standard web request.
The group data import allows you to pre-populate Warpwire with a listing of every group within your information system. This allows for users to search and share content with additional groups within your organization, even if a member of that course has not yet authenticated. This both simplifies the workflow and creates a more seamless user experience. Additionally, if there are courses which are cross-listed or that share a standard set of instructional material, you can indicate this relationship within your data import. This will automatically create the sharing relationship in Warpwire and will not require the end-user to perform any additional actions to correctly share this content.
All data import CSV files require a header field. All of the parameters listed below must exist in the header field. The header columns can be provided in any order and any additional header parameters are allowed but will be ignored when processing the data file.
| Header Name | Description | Example |
|---|---|---|
| group_id | The unique internal identifier for the group within your organization. This name should be consistent across all data systems. This value must correspond to the value returned via LTI, your information system, etc. | 15/FA*REL*356*P1 |
| group_name | (Optional) The name of the group as specified by your organization. This is the name that a user will see when sharing media assets. If this value is empty, the value of the group_id will be used. Functions as human- readable alias for group_id. | 101 Music Theory Lecture |
| provider_id | The internal identifier that will link this group to a corresponding Warpwire Media Library (course). For instance, in Sakai this is often the Site ID value. If a Media Library doesn't yet exist for the course, one will be created. | dd7235c3-7218-4c8b- a539-daa46241d9b5 |
| course_name | The name of the course as specified by your organization. This will be the name of the Media Library. Think of this as a required alias for provider_id. | 15_FA_MEE_312L_01 |
| hidden | (Optional) A boolean value 1 that indicates whether a user within the group can view the contents of the Media Library. The default is false (0), which means that the relationship is not hidden. | 1 |
Group ID
This field is the internal representation of the group within your LMS or information system. The value you supply for this field in your CSV file must exactly match the expected value returned from your LMS. Warpwire will automatically map the group context returned from your authentication system to the corresponding group_id record. If you have several sections of a course that share the same site within your LMS, you must explicitly include a unique record for each section of that course. The only value that should differ between records is the group_id. When you import the CSV file, Warpwire will transparently create a sharing relationship for each section within the course site. This will then allow any user in the respective groups/sections to view the content while providing you with the ability to selectively remove group access from the Warpwire Media Library.
Group Name
The value that you provide for this field will be visible to users when assigning or changing permissions. Therefore, it is important that you use a consistent convention for the courses that will be understandable to your users. The group_name field takes precedent over the group_id field with respect to what a user sees while searching. You can think of the group_name as the human-readable alias of the group_id. Each group_id only has one group_name.
Please note that the group_name is different than the course_name. A user sees the value of the group_name when doing a permission search. However, once a group is selected to assign permission, the name of the attached Media Library will reflect the course_name value.
The Relationship between the parameters:
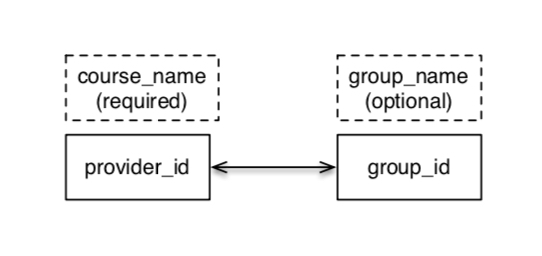
Course_name corresponds to a single course in your LMS - it's the title of the Media Library for that course. Many group_ids (displayed as group_names if a name has been supplied) might be granted access to view that course. A single group_id might have access to many Courses (course_name, tied to a single provider_id).
You can think of provider_id and course_name as a linked pair. The same is true for group_id and group_name. Courses can have many associated groups, and groups can be associated with many courses.
A user assigning permission to a media asset. The value of the group_name is shown in the search list.
Provider ID
This field represents the internal identifier for a course within your Learning Management System or the designation for a specific group. For instance, if you create a course site that has three sections that share the same course site, you should have three records within your CSV file with the exact same provider_id. However, each of these entries would differ because they would have a different group_id. The combination of provider_id and group_id must be unique. Any duplicated records will be skipped during processing.
Course Name
The course name is a required field that is used as the title of the Media Library. The Media Library title is assigned to each unique provider_id entry. You can think of the course_name as the human readable alias for the provider_id. If you use the same provider_id with a different course_name it will overwrite the previous course name. That is, the Media Library's name will be overwritten and changed. Please note that the course_name may be different than the group_id. It is recommended that the course_name reflect the same name that you use within your LMS or information system.
Hidden
The hidden field allows for you to archive groups and courses at the end of a semester or when the group has been dissolved. By default this field is set to false so that each entry in your CSV file is treated as an active share relationship. However, when you wish to archive a Media Library and remove access, simply set this field to “1,” which will remove the corresponding share relationship from the course and thus restrict access to the course site. Furthermore, if you decide to reinstate that share relationship and reactivate the Warpwire Media Library, simply change this value back to “0.” Please note that if you do not include a value for the hidden field, the default response is always to enable and show the share relationship.
In the following examples, a course will be imported via CSV. Next, some parameters will be edited for that course. Finally, two additional sections of the same course will be added. These examples will help illustrate the roles of the parameters as well as potential use cases for editing them.
Example 1
In the following example, a single course and group will be imported. If the Media Library already exists, then the group “16sp*hist*101*1” will be created, and grated access to that course. If the course doesn't yet exist, it's Media Library will be created, and named “History 101.” Below, see the example CSV file for this course:
| # | group_id | group_name | provider_id | course_name | hidden |
|---|---|---|---|---|---|
| 1 | 16sp*hist*101* 1 | 12345abc | History 101 | 0 |
Using the curl command described in the following section, issue the same command described previously, and then check the output URL to verify success or be notified of errors.
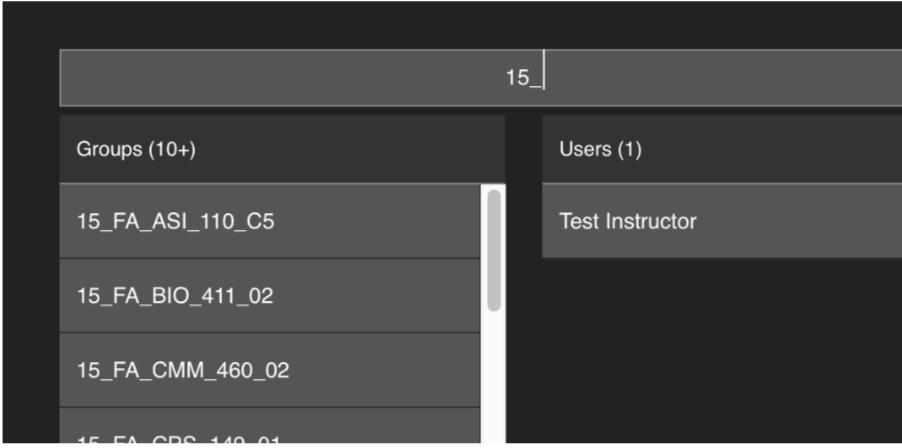
In the Warpwire application, "History 101" will appear as a Media Library for those users who are part of the group. Below, see the sharing options page search results, as they'll appear in the Warpwire application:
Group search on the sharing options page. Here, because no group_name was provided, the group_id appears in the search results.
Example 2
Now that the course and group have been imported, try making some changes to the record. The course_name parameter determines the name of the Media Library associated with the course. If the course_name field is changed from “History 101” to “Ancient History 101,” the Media Library name will reflect the new course name, once the edited CSV has been imported.
What if a group_name is added to this course? Group_name acts as a human-readable alias when looking for the group during a search on the sharing options page.
The edited CSV:
| # | group_id | group_name | provider_id | course_name | hidden |
|---|---|---|---|---|---|
| 1 | 16sp*hist*101* 1 | A. Hist 101 | 12345abc | Ancient History 101 | 0 |
Using the curl command described in the following section, issue the same command described previously, and then check the output URL to verify success or be notified of errors. The file name remains the same, the CSV has simply been edited.
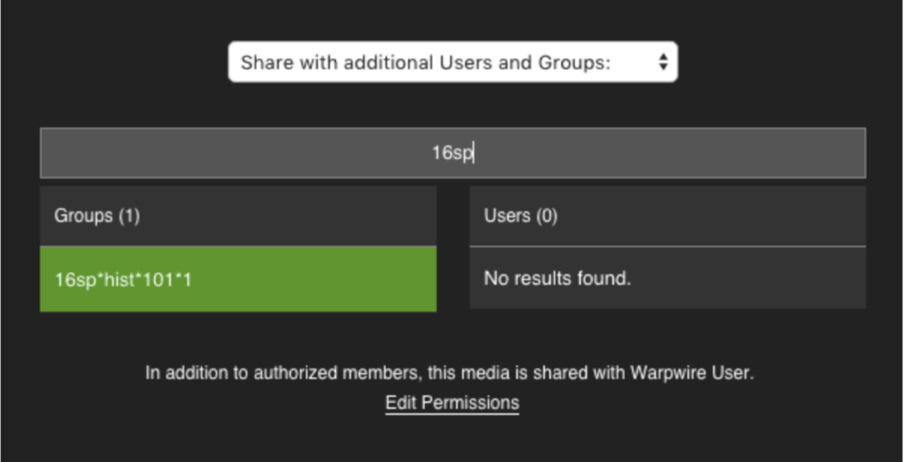
In the Warpwire application, the Media Library will now appear as "Ancient History 101."
With the edited CSV imported, when searching for "A.Hist 101" on the sharing options page, the new group name ("A.Hist 101") appears, rather than the group_id (16sp*hist*101*1).
Now that a group_name has been added, it will appear in the group search on the sharing options page instead of the group_id.
Example 3
Now, let's imagine the history course is so popular that two additional sections have been added. Here is an example CSV to illustrate how to add two sections (that is, two unique groups):
| # | group_id | group_name | provider_id | course_name | hidden |
|---|---|---|---|---|---|
| 1 | 16sp*hist*101* 1 | A. Hist 101 01 | 12345abc | Ancient History 101 | 0 |
| 2 | 16sp*hist*101* 2 | A. Hist 101 02 | 12345abc | Ancient History 101 | 0 |
| 3 | 16sp*hist*101* 3 | A. Hist 101 03 | 12345abc | Ancient History 101 | 0 |
The provider_id fields will be identical for the three sections, as will the course_name fields. With these two parameters consistent between the three sections, it ensures that they will all share a single Media Library.
The three sections are distinguished via the group_id field (and the group_name field, if it is populated).
Using the curl command described in the following section, issue the same command described previously, and then check the output URL to verify success or be notified of errors. The file name remains the same, the CSV has simply been edited.
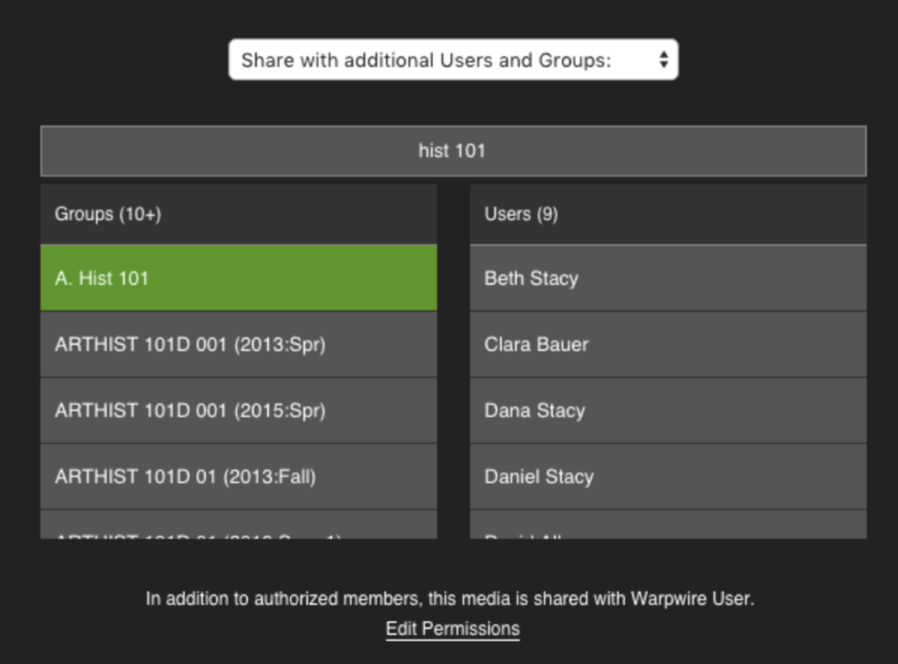
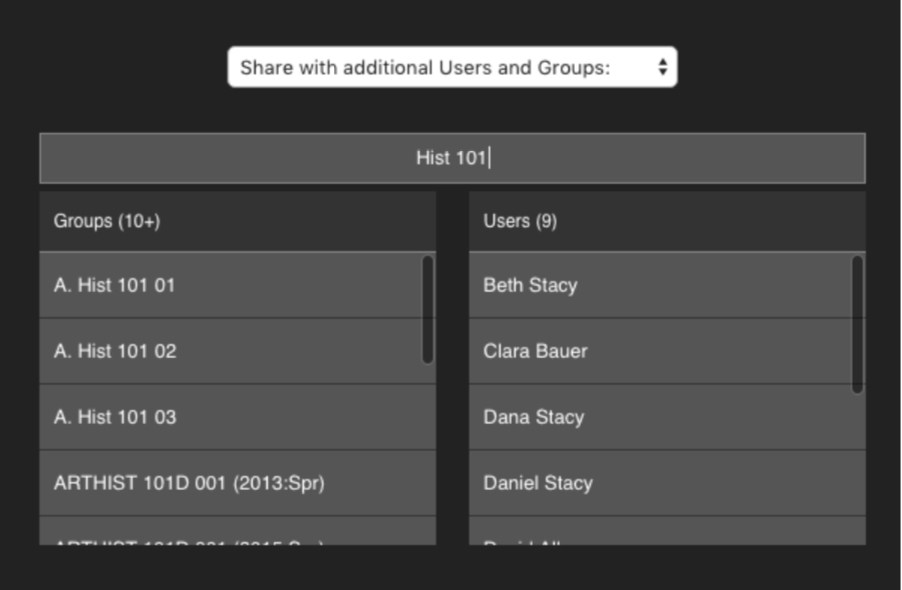
When searching for groups on the Warpwire sharing options page, you will now see all three sections, as defined by the group_names we just imported:
The multiple sections of "Ancient History 101" have unique group_name fields, representing three unique group_ids. Searching for "Hist 101" on the sharing options page reveals the three sections.
| # | group_id | group_name | provider_id | course_name | hidden |
|---|---|---|---|---|---|
| 1 | 15/ME*REL*1 | abc-def-012-456 | 15_ME_REL | ||
| 2 | 15/ME*REL*2 | abc-def-012-456 | 15_ME_REL | ||
| 3 | 16/ART*ST*9 | Art Studio | 0123-456-789 | IND STU 03 | |
| 4 | 17/MUS_305_1 | 333-222-aaa | MUS_305_A | 1 |
In the above example there are four relationships that must be evaluated. Two of the courses (entries 1 and 2) share the same provider_id (abc-def-012-456) which indicates that they are different sections of the same course. This is further reinforced by the group_id only differing by one value. Entry 3 is a course with a special human readable group name value used to enhance permission searching. Finally, entry 4 is being suppressed from both appearing in any searches or allowing members to have access to the corresponding Media Library. This feature would be useful if a course had ended, and you wanted to achieve it and remove user access to the Media Library.
Using curl you would issue the following command:
curl -X POST \
-F "wwType=data-import" \
-F "wwCollection=group" \
-F "nonce=0" \
-F "wwObject=roster" \
-F "x-auth-wwtoken=<AUTHENTICATION_TOKEN>" \
-F "_WWORIGIN=<WARPWIRE_DOMAIN>" \
-F "wwUploadParam[email][]=<EMAIL_ADDRESS_A>" \
-F "wwUploadParam[email][]=<EMAIL_ADDRESS_B>" \
-F "_wwUploadFile=@<CSV_IMPORT_FILE>" \
<WARPWIRE_UPLOAD_URL>
Line 1: Standard curl command to initiate a standard RFC 1867 HTTP POST command.
Line 2-5: The Warpwire upload server requires a number of specific upload parameters to correctly process your file. The wwType is equal to “data-import” which is used solely for communicating CSV information from an organization to Warpwire. The wwCollection and wwObject variables provide the specific type of data-import that is being performed.
Line 6: If you were given a valid Warpwire token, you will replace <AUTHENTICATION_TOKEN> with your provided key. Be sure to delete the < > brackets. Please do not provide this key to any unauthorized user.
Line 7: This is the name of your Warpwire account. For instance, if your URL to Warpwire is https://example.warpwire.com it is likely that your WARPWIRE_DOMAIN is "example". Replace WARPWIRE_DOMAIN with your URL. Be sure to delete the < > brackets. Please consult your documentation or contact a member of Warpwire support to confirm.
Line 8-9: The data import service allows you to provide a list of email addresses to which all output data will be sent. You are allowed to provide up to 10 different email addresses to receive all output messages sent. Replace <EMAIL_ADDRESS_A> with the email address to receive the notifications. Be sure to delete the < > brackets. Please make sure that the email accounts are able to receive standard attachments. It is highly recommended that you always include an email address with these services - otherwise you will not receive any notification regarding issues with your import. Please note that no email addresses are stored and the list of email addresses can change on each subsequent upload. Be sure to delete line 9 if you only provide a single email address.
Line 10: You must specify the path of your CSV file. If your are using cron or an automated service, it is highly recommended that you use the absolute file path to ensure that you do not have any path issues. You must include the “@“ before the file path to ensure that curl uploads the file to the server. Be sure to remove the < > brackets.
Line 11: Post your request to Warpwire using this URL (which Warpwire will provide prior to import).
A complete example would look like this:
Input:
curl -X POST \
-F "wwType=data-import" \
-F "wwCollection=group" \
-F "nonce=0" \
-F "wwObject=roster" \
-F “x-auth-wwtoken=assar3F2irifnfnUIsdgIRsasf24234nief9842n4ifoaeinfdfhsdl” \
-F "_WWORIGIN=example" \
-F “wwUploadParam[email][]=john.frank@warpwire.com" \
-F “wwUploadParam[email][]=sarah_smith@warpwire.com” \
-F "_wwUploadFile=@courses1.csv" \
https://upload.warpwire.com/serviceIngestion
Output:
["https:\/\/upload.warpwire.com\/status\/? _WWORIGIN=example&uuid=i4235mfi3i3IEWIdWEBceQ22WPUPs8f0UphfuXlh YSAx8EPiVR"]
Once you issue this command, the server should return a HTTP/1.1 200 OK message. It will also return a JSON-encoded string that is the URL that you can access to view the status of your request. When you navigate to the URL to view the request status, it will provide additional information regarding your request.
For instance, if you supply the wrong authentication credentials, you will receive the following message when you visit the output URL above:
{"i4235mfi3i3IEWIdWEBceQ22WPUPs8f0UphfuXlhYSAx8EPiVR": {"status":"failed","complete":"failed","uuid":"roster","message":"Authentication information is not valid. Please sign in again.”}}
The output, also in JSON format, will indicate that the service was unable to validate your authentication credentials and has failed. Please verify your credentials and ensure that you have correctly authenticated. Additionally, you will not receive any email messages when the status is not equal to success.
When your transaction is successful, you will see the following message:
{“i4235mfi3i3IEWIdWEBceQ22WPUPs8f0UphfuXlhYSAx8EPiVR": {"status":"done","complete":"success","uuid":"DI-23849-78823-77823-87141"}}
When the upload is successful, you will receive a UUID value for this file. You can provide this value to Warpwire support to diagnose any issues or to provide additional feedback. If you supplied an email address, you will also receive a status email.