This guide will explain how OAuth 2.0 can be leveraged to allow your third party application to make requests to Warpwire's API on behalf of the end user at the institution your application is partnering with.
OAuth 2.0 allows third party applications to request authorization to act on a user's behalf, without the user having to expose their username and password. In this way, once authorization had been granted, your client application can make requests to Warpwire's API on behalf of the authorized user.
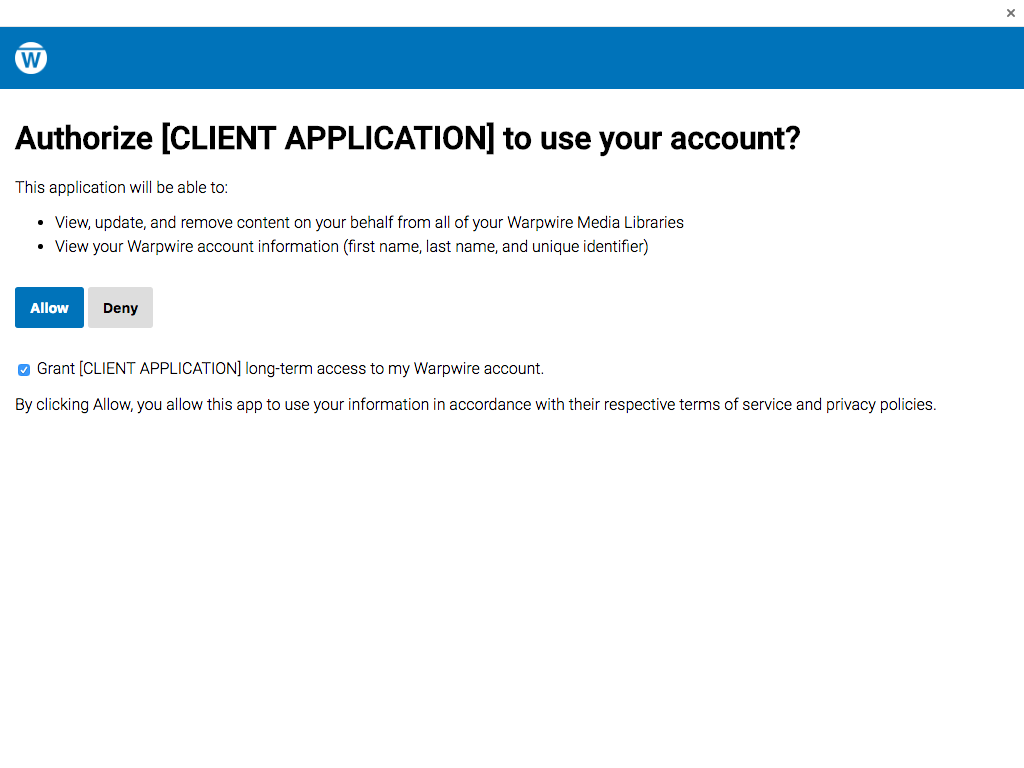
The client application will direct the end user to a Warpwire Authorization page, where the user can approve or deny the authorization request using their institutional SSO login credentials. The user will then be redirected to a callback URL provided by the client application. If the authorization request is approved, the client application will receive an access_token. If the user approved long-term offline access by your application, then you will also receive a refresh_token.
This access_token acts as a temporary password, granting the client application limited access to "log in" as a user and act on their behalf. Tokens are time limited. If a token expires, the client application will either have the end user re-authorize, or use a refresh_token to get a new, unexpired access_token.
This process ensures that end users have control over how and when they grant authorization to outside applications. OAuth provides a simple way for third party applications to interface with any Warpwire user, without having to understand each institution's custom SSO integrations.
Workflow
Begin by registering your application with the administrators of Warpwire at the institution you're interfacing with. After registering, you'll receive a client_id and client_secret, which you'll use to make requests.
At registration, you'll need to provide all possible callback URLs, so that Warpwire can match them against the redirect URLs provided in your authorization requests for users.
You'll link your users to the authorization endpoint, where they'll log in, if they haven't already. When you send the user to the endpoint, be sure to set the following parameters:
response_type = code
client_id = the id you were given at registration*
redirect_uri = (must match) one of the URLs that you have whitelisted
access_type = set to offline if you want access to refresh_token
state = a unique string used to verify state consistency, to mitigate CSRF attacks
* Note: Multiple domains can be whitelisted as valid redirect locations for your Oauth response. Read the Oauth section of the Data API for additional information on configuring the whitelisted domains.
HTTP/1.1 302 Found
Location: https://example.warpwire.com/api/oauth/authorize?response_type=code&client_id=client123&redirect_uri=http://client.com/callback&state=EwLhomzP42dOss6x
They'll then see the authorization request form, and either approve or deny the authorization request. The request form will indicate the name of the application requesting authorization, which permissions the application is requesting.
Once the form is submitted, the user will be redirected to the redirect_uri provided by the client application at registration, using 302 FOUND redirect.
The response, if valid, should include the same state value as in the request parameter. If the state does not match, or is invalid, you should halt the workflow - do not continue.
If the user granted authorization, the client will receive a code, which can be exchanged for an access_token, and state which, as stated above, should match the value passed in the request.
GET /cb?code=KI3zGhVdDzFWwkOa&state=EwLhomzP42dOss6x HTTP/1.1
Host: client.example.com
If the user denied the authorization request, check the response for error and error_description, along with state (which should still match the request parameter!)
GET /cb?error=access_denied&error_description=description+of+error+here+&state=EwLhomzP42dOss6x HTTP/1.1
Host: client.example.com
If access was granted, next exchange the code for an access_token by making a request to the Warpwire API. Your request should include the following parameters:
grant_type = set to authorization_code
code = the code you received in the authorization response
redirect_uri = must match a URL given in authorization request, or token will not be given
client_id = the ID you received at registration
client_secret = the secret you receives at registration
POST /api/oauth/access_token HTTP/1.1
Host: example.warpwire.net
Content-Type: application/json
{
  "grant_type": "authorization_code",
  "code": "KI3zGhVdDzFWwkOa",
  "redirect_uri": "https://client.example.com/callback",
  "client_id": "client123",
  "client_secret": "2Oer67X5KnbmNylo"
}
You'll receive a response from Warpwire that includes the following parameters:
token_type = bearer
access_token = unique string used to authenticate API requests on behalf of the user
expires_in = number of seconds access_token will remain valid
refresh_token = if offline access was granted, you'll have a string here which can be used to get a new access_token when the current one expires
HTTP/1.1 200 OK
Content-Type: application/json
{
  "token_type": "Bearer",
  "access_token": "PWB0Wm97irdYcAye",
  "expires_in": 7200,
  "refresh_token": "TE1Eduhx5lStSldE"
}
With your access_token in hand, you can now make API requests on behalf of the authorized user. Pass the access_token via the authentication header.
When, after the allotted seconds have passed, the access_token expires, you will receive a 401 Unauthorized error from Warpwire, along with an "invalid credentials" message, or similar.
HTTP/1.1 401 Unauthorized
Content-Type: application/json
{
  "message": "Invalid credentials"
}
To re-authorize, either go through the authorization process again, or if you have a refresh_token, make a refresh request, using the following parameters:
grant_type = refresh_token
refresh_token = the token you received
client_id = the id you were given at registration
client_secret = the secret you were assigned at registration
POST /api/oauth/access_token HTTP/1.1
Host: example.warpwire.net
Content-Type: application/json
{
  "grant_type": "refresh_token",
  "refresh_token": "TE1Eduhx5lStSldE",
  "client_id": "client123",
  "client_secret": "2Oer67X5KnbmNylo"
}
If your request is successful, you'll receive a new access_token and refresh_token in Warpwire's response. Please note that the refresh_token can only be used once. Make sure to store the value, or you'll have to begin the authorization process again. Once a refresh_token is used, it becomes invalid. It will be replaced with a new refresh_token.
The response will include the following parameters:
token_type = bearer
access_token = the new token you can use to authenticate API requests
expires_in = number of seconds the token will be valid
refresh_token = a new token that overwrites the one made in the original refresh request
Repeat the refresh request process as needed, as each refresh_token can be used only once.
HTTP/1.1 200 OK
Content-Type: application/json
{
  "token_type": "Bearer",
  "access_token": "PWB0Wm97irdYcAye",
  "expires_in": 7200,
  "refresh_token": "TE1Eduhx5lStSldE"
}